IdP, SP, DS に関する設定・運用・カスタマイズの各種情報についてまとめるページです。
目次
別ページの情報:
IdP関連情報
Back-Channel設定
Tomcat : clientAuth="want"の確認
「技術ガイド > IdPセッティング > サーバ証明書の設定 > Back-Channelの設定」の「2.SOAP設定」でserver.xmlに clientAuth="want" と設定している部分があります。学認推奨値は一環して want ですが、Shibboleth開発元(Shibboleth Wiki)では clientAuth="true" と指示されていた期間がありました(正確な時期は不明ですが2012年6月より前)。もしShibboleth Wikiの情報でIdPを構築された方は、Tomcatの設定ファイルserver.xmlの設定値を今一度確認することをおすすめします。
クライアント認証
Back-ChannelでSPからクライアント認証を受け付けるときに、クライアント証明書のExtenededKeyUsageにclientAuth(TLS Web Client Authentication)なしの証明書が用いられる可能性を考慮して設定を行なうことを推奨します。例えば、UPKIのサーバ証明書プロジェクトで発行されたサーバ証明書には、通常はclientAuth(TLS Web Client Authentication)がありません。
SPが下記の証明書を用いてBack-Channel接続を行ってきた場合にIdPがSPのクライアント認証を受け付けずにエラーとする実装があるようです。
$ openssl x509 -in sp-certificate.pem -noout -text | grep -A 1 'X509v3 Extended Key Usage:'
            X509v3 Extended Key Usage:
                TLS Web Server Authentication
- clientAuth(TLS Web Client Authentication) なし
- serverAuth(TLS Web Server Authentication) あり
LDAP
LDAPプロキシサーバ : 複数台LDAPサーバ向けのLDAPプロキシサーバ設定方法
IdPから複数台のLDAPサーバの情報を参照するために使用するLDAPプロキシサーバ設定方法を資料にまとめました。各LDAPサーバとLDAPプロキシ間はLDAPS接続またはStartTLS接続をするものとします。詳細はPDF資料をご参照ください。
プロキシサーバを構築する際、ログイン画面で入力するID(Shibboleth内部ではprincipalと表現されます)について、同一のIDが複数のLDAPツリー上に存在しないことを確認してください。そうでなければ属性取得で問題が発生します。uidがこの条件を満たさない場合は、メールアドレスや学籍番号・教職員番号等を使うことを検討してください。
複数台LDAPサーバ向けの別の方法
内容の異なる複数のLDAPツリーを横断的に検索するlogin.configの例はShibboleth Wiki:IdPAuthUserPassの"Stacking Login Modules"の項にあります。この場合、attribute-resolver.xmlでは2つのLDAP DataConnectorを定義し両方をDependencyに記述してください。
前項と同様、同一のIDが2つのLDAPツリー上に存在すると問題になりますので、uidがこの条件を満たさない場合は他の属性をID(principal)として使うようにしてください。
特定のSPへのアサーションを暗号化しない設定
学認では技術運用基準として、アサーション(IdPで生成した利用者の属性等の情報)をSPに送る際には暗号化すべき(SHOULD)であると定めています(*1)が、Google AppsやOffice 365などのように暗号化したアサーションを受け付けないSPも存在します。Shibboleth IdPのデフォルトの挙動は、全てのSPに対して送信するアサーションを暗号化するようになっていますので、そのような特定のSPに対して送信するアサーションを暗号化しないように設定する方法を以下に記載します。
- (*1) 学認技術運用基準 (Ver.2.0)
2.2) 認証応答
(...略...)さらに、認証アサーションに対して、暗号化をすべきである。
relying-party.xmlの<DefaultRelyingParty>の下に次のように特定のSPに対する設定を追加します。SPのentityID の部分と IdPのentityID の部分を適切に置き換えてください。また、<RelyingParty>内の設定内容(子要素)はIdPにより異なりますので、既存の<DefaultRelyingParty>の子要素をコピーして挿入し、encryptAssertionsおよびencryptNameIdsを"never"に変更するようにしてください。
<RelyingParty id="SPのentityID"
    provider="IdPのentityID"
    defaultSigningCredentialRef="IdPCredential">
    ...
    <ProfileConfiguration xsi:type="saml:SAML2SSOProfile"
        includeAttributeStatement="true"
        assertionLifetime="300000"
        assertionProxyCount="0"
        signResponses="conditional"
        signAssertions="never"
        encryptAssertions="never"
        encryptNameIds="never" />
    ...
</RelyingParty>
- 参考情報
- 情報元: https://www.gakunin.jp/ml-archives/upki-fed/msg00615.html
- 特定のSPへのアサーションを暗号化しないことに関するポリシーの議論:
http://marc.info/?t=136497370800001&r=1&w=2
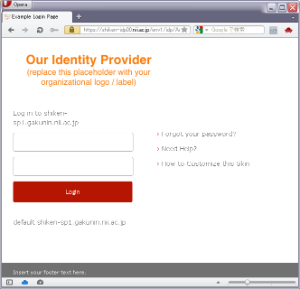
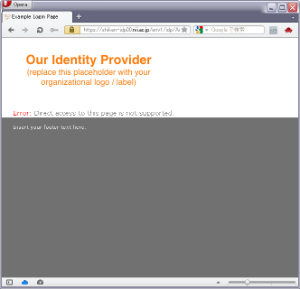
IdPの認証画面に直接アクセスしたときのエラー表示追加方法
IdPの認証画面でユーザが遭遇するエラーの一般的なものとして、SPを経由せずにブックマーク、履歴、戻るボタン等からIdPの認証画面に直接アクセスしてしまうというものがあります。
idp.warに含まれるlogin.jspを後述の通り修正することで、SPを経由せずにIdPの認証画面に直接アクセスした場合はエラーを表示させることができます。
login.jspに以下の内容を追記します。
<%@ page import="edu.internet2.middleware.shibboleth.idp.util.HttpServletHelper" %>
<%@ page import="org.opensaml.util.storage.StorageService" %>
<%@ page import="edu.internet2.middleware.shibboleth.idp.authn.LoginContext" %>


<%
   StorageService storageService = HttpServletHelper.getStorageService(application);
   LoginContext loginContext = HttpServletHelper.getLoginContext(storageService,application, request);
%>

<% if (loginContext == null) {%>

  <!-- エラー時に表示するメッセージ等をここに記載します。以下はエラーメッセージの例です。 -->
  <p><font color="red">Error:</font> Direct access to this page is not supported.</p>

<% } else { %>

   <!-- 認証画面のログインフォーム部分等のエラー時に表示させたくない部分をこちらに記載します。 -->

<% } %>
例) IdP 2.4.0デフォルトのlogin.jspをベースに上記内容を適用した場合
SPを経由した場合の通常のIdP認証画面
直接アクセスした場合のIdP認証画面
特定のSPに対しePPNをNameIDに入れて送る設定方法
これまで学認では、ユーザに関する情報は属性(Attribute)としてIdPからSPへ渡すものとして説明してきましたが、非ShibbolethのSP側SAML実装では、属性ではなくNameIDというものを介してユーザ識別子を渡すように要求するものがあります。つまり、通常のePPN等属性を介した受け渡しではうまく機能しません。
このようなSPに対してeduPersonPrincipalName(ePPN)属性の値をNameIDに入れて渡す方法を書きます。
ePPNを例としていますが、生のuidやその他の識別子を送る場合も基本的には同じです。グローバルな設定とするのではなく、個々のSPに対してフィルタ設定を行なってください。
なお、入れ物(ePPN属性として送るかNameIDとして送るか)が異なるだけで、ePPNを送るという行為には違いがありません。個人情報の取り扱いはくれぐれも慎重にお願いします。
(NameIDを暗号化する設定項目があったりもしますので厳密には異なる場合がありますが、暗号化を1回かけるか2回かけるか程度の違いです)
なお、デフォルト設定ではNameIDには何も入らないということではなく、transientIdというものが入って受け渡されます。transientIdは、いわゆるIdPにおけるセッションIDのようなもので、IdPで認証するたびに異なるIDが割り当てられます。
主に、SP側でのインシデント対応時のユーザ特定に用いられます。(電子ジャーナルなど、SP側でユーザを識別していない場合の話で、特定のためにはIdP側の協力が必要です。)
attribute-resolver.xmlの設定
NameIDとしてePPNを生成するAttributeDefinition(id=nameIdEPPN)をattribute-resolver.xmlへ追加します。
    <resolver:AttributeDefinition id="nameIdEPPN" xsi:type="Template"
                              xmlns="urn:mace:shibboleth:2.0:resolver:ad">
        <resolver:Dependency ref="eduPersonPrincipalName"/>
        <resolver:AttributeEncoder xsi:type="SAML2StringNameID"
                               xmlns="urn:mace:shibboleth:2.0:attribute:encoder"
                               nameFormat="urn:oid:1.3.6.1.4.1.5923.1.1.1.6" />
        <Template>
            <![CDATA[
                ${eduPersonPrincipalName}@<スコープ>
            ]]>
        </Template>
        <SourceAttribute>eduPersonPrincipalName</SourceAttribute>
    </resolver:AttributeDefinition>
attribute-filter.xmlの設定
例えば、entityID="https://example.org/shibboleth-sp" のSPに対しNameIDとしてePPNを送出するには、下記の設定をattribute-filter.xmlに追加します。
※学認ガイドに従って構築されたIdPでは、通常NameIDにはtransientIdが使われており、デフォルトで全てのSPに対してこのNameIDが送出される設定になっています。1つのアサーションに複数のNameIDを入れることはできないため、下記にはtransientIdのNameIDを送出させないための設定が入っています。
    <afp:AttributeFilterPolicy id="PolicyforExampleOrg" xmlns:afp="urn:mace:shibboleth:2.0:afp">
        <afp:PolicyRequirementRule xsi:type="basic:AttributeRequesterString"
            value="https://example.org/shibboleth-sp" />
        <afp:AttributeRule attributeID="transientId">
            <afp:DenyValueRule xsi:type="basic:ANY" />
        </afp:AttributeRule>
        <afp:AttributeRule attributeID="nameIdEPPN">
            <afp:PermitValueRule xsi:type="basic:ANY" />
        </afp:AttributeRule>
    </afp:AttributeFilterPolicy>
idやvalueはSP毎に変わりますので、下表を参考に各SPに合わせて設定してください。
| 要素名 | 属性名 | 説明 |
|---|---|---|
AttributeFilterPoicy | id | ポリシー名として一意な値を設定してください。例えば、学認Webサイト IdP・SP一覧の管理者向けマニュアルでは"Policyfor<SP名>"としています。 |
| value | 属性送出先のentityIDを設定します。 |
IdPにてNameIDを暗号化する設定にしている場合、上記設定だけではうまく連携できない可能性があります。その場合は、特定のSPへのアサーションを暗号化しない設定を参考に、encryptAssertionsは<DefaultRelyingParty>の設定を引き継ぎ、encryptNameIdsだけを"never"に変更してください。
特定のSPに対しメールアドレスをNameIDに入れて送る設定方法
基本的な方法はePPNをNameIDに入れて送る場合と同じです。
attribute-resolver.xmlの設定
NameIDとしてメールアドレスを生成するAttributeDefinition(id=nameIdEmail)をattribute-resolver.xmlへ追加します。
    <resolver:AttributeDefinition id="nameIdEmail" xsi:type="Simple"
                              xmlns="urn:mace:shibboleth:2.0:resolver:ad"
                              sourceAttributeID="mail">
         <resolver:Dependency ref="myLDAP" />
         <resolver:AttributeEncoder xsi:type="SAML2StringNameID" xmlns="urn:mace:shibboleth:2.0:attribute:encoder"
                    nameFormat="urn:oasis:names:tc:SAML:1.1:nameid-format:emailAddress" />
    </resolver:AttributeDefinition>
attribute-filter.xmlの設定
例えば、entityID="https://example.org/shibboleth-sp" のSPに対しNameIDとしてメールアドレスを送出するには、下記の設定をattribute-filter.xmlに追加します。
    <afp:AttributeFilterPolicy xmlns:afp="urn:mace:shibboleth:2.0:afp">
        <afp:PolicyRequirementRule xsi:type="basic:AND">
            <basic:Rule xsi:type="basic:AttributeRequesterString" value="https://example.org/shibboleth-sp" />
            <basic:Rule xsi:type="basic:PrincipalNameString" value="test001" />
        </afp:PolicyRequirementRule>

        <afp:AttributeRule attributeID="transientId">
            <afp:DenyValueRule xsi:type="basic:ANY" />
        </afp:AttributeRule>

        <afp:AttributeRule attributeID="nameIdEmail">
            <afp:PermitValueRule xsi:type="basic:ANY" />
        </afp:AttributeRule>

    </afp:AttributeFilterPolicy>
idやvalueはSP毎に変わりますので、下表を参考に各SPに合わせて設定してください。
| 要素名 | 属性名 | 説明 |
|---|---|---|
AttributeFilterPoicy | id | ポリシー名として一意な値を設定してください。例えば、学認Webサイト IdP・SP一覧の管理者向けマニュアルでは"Policyfor<SP名>"としています。 |
| value | 属性送出先のentityIDを設定します。 |
IdPにてNameIDを暗号化する設定にしている場合、上記設定だけではうまく連携できない可能性があります。その場合は、特定のSPへのアサーションを暗号化しない設定を参考に、encryptAssertionsは<DefaultRelyingParty>の設定を引き継ぎ、encryptNameIdsだけを"never"に変更してください。
属性値生成
同じ値が再割り当てされないeduPersonTargetedIDの生成方法
eduPersonTargetedID(ePTID)を生成するときにLDAP上の属性としてuidを代表とした属性値が利用されますが、これらの属性値では再割り当ての問題があります。例えばuidとして test001 を使っていた人が異動になり、さらに年月が経って同じuidを使いたいという人が現われた場合にはそのまま割り当ててしまうことはできません。これはSP 側で uid=test001 という属性値を基に生成されたePTIDで個人を識別していた場合に、再割り当て前の人物と、再割り当て後の人物を区別できず同一人物とみなして再割り当 て前のアカウントの情報を利用してしまうことが起こるためです。
ePTIDでStoredIDを利用している場合には失効処理を行うことで新しいePTIDを生成することができることから、ソースとなる属性値の再割り当てをすることは可能です。今回は別の方法として、uidの付加情報としてLDAPエントリの作成時間(createTimestamp)を加えた値をソースとしてePTIDを生成する方法を調査しました。例えば uid-createTimestamp のように2つの属性値をハイフンでつなげて test001-20130314110740Z といった値をソースとしてePTIDを生成すれば、uid再割り当てごとの失効処理が不要となります。ただし、再割り当ての際に必ず「作成時間」が変更さ れるように処理することが前提となります。
下記ではLDAP上のuidとcreateTimestampをソースとしたePTIDの生成例をご紹介いたします。ComputedIDをベースに設定方法を紹介していますが、StoredIDの場合も同様です。
eduPersonTargetedIDのAttributeDefinitionはデフォルトのままで利用可能です。
    <!-- Attribute Definition for eduPersonTargetedID -->
    <resolver:AttributeDefinition id="eduPersonTargetedID" xsi:type="SAML2NameID" xmlns="urn:mace:shibboleth:2.0:resolver:ad"
        nameIdFormat="urn:oasis:names:tc:SAML:2.0:nameid-format:persistent"
        sourceAttributeID="computedID">
        <resolver:Dependency ref="computedID" />

        <resolver:AttributeEncoder xsi:type="SAML1XMLObject" xmlns="urn:mace:shibboleth:2.0:attribute:encoder"
                name="urn:oid:1.3.6.1.4.1.5923.1.1.1.10" />

        <resolver:AttributeEncoder xsi:type="SAML2XMLObject" xmlns="urn:mace:shibboleth:2.0:attribute:encoder"
                name="urn:oid:1.3.6.1.4.1.5923.1.1.1.10" friendlyName="eduPersonTargetedID" />
    </resolver:AttributeDefinition>
Template Attribute Definitionで uid-createTimestamp の文字列を返すAttributeDefinitionを定義して、ComputedID用DataConnectorの sourceAttributeID, Dependencyを変更します。ここでは「templateePTID」という名前を用います。
    <!-- Computed targeted ID connector -->
    <resolver:DataConnector xsi:type="ComputedId" xmlns="urn:mace:shibboleth:2.0:resolver:dc"
                            id="computedID"
                            generatedAttributeID="computedID"
-                           sourceAttributeID="uid"
+                           sourceAttributeID="templateePTID"
                            salt="*****YOUR_SALT*****">
-       <resolver:Dependency ref="myLDAP" />
+       <resolver:Dependency ref="templateePTID" />
    </resolver:DataConnector>

+   <resolver:AttributeDefinition id="templateePTID" xsi:type="Template" xmlns="urn:mace:shibboleth:2.0:resolver:ad">
+       <resolver:Dependency ref="myLDAP" />
+
+       <Template>
+           <![CDATA[
+               ${uid}-${createTimestamp}
+           ]]>
+       </Template>
+
+       <SourceAttribute>uid</SourceAttribute>
+       <SourceAttribute>createTimestamp</SourceAttribute>
+   </resolver:AttributeDefinition>
LDAPからcreateTimestampを取得するためにReturnAttributesを定義します。
    <resolver:DataConnector id="myLDAP" xsi:type="dc:LDAPDirectory"
        ldapURL="ldap://localhost"
        baseDN="o=Test Organization,dc=ac,c=JP"
        principal="cn=olmgr,o=Test Organization,dc=ac,c=JP"
        principalCredential="**** YOUR LDAP Password ****">
        <dc:FilterTemplate>
            <![CDATA[
                (uid=$requestContext.principalName)
            ]]>
        </dc:FilterTemplate>
+       <dc:ReturnAttributes>* createTimestamp</dc:ReturnAttributes>
    </resolver:DataConnector>
Async SLO(Asynchronous Single Logout)の設定方法
ShibbolethにおけるAsync SLOの設定方法を記載します。
前提
IdP/SPはそれぞれ以下のバージョンであることを前提とします。
- IdP: 2.4.0
- SP : 2.5.3
IdPの設定
メタデータへ<SingleLogoutService>を追加
IdP のメタデータに<IdPSSODescriptor>の子要素として<SingleLogoutService>を追加します。以下は学認のテンプレート通りのメタデータに追加した場合の例です。Locationのホスト名部分(idp.example.ac.jp)は適宜読み替えて下さい。IdPが特殊な設定でなければ、ホスト名部分のみ合わせれば問題ありません。
<!-- (省略) -->
                 </ds:X509Certificate>
               </ds:X509Data>
             </ds:KeyInfo>
           </KeyDescriptor>
           <!-- ↓↓↓ ここから追加 ↓↓↓ -->
           <SingleLogoutService Binding="urn:oasis:names:tc:SAML:2.0:bindings:HTTP-Redirect" Location="https://idp.example.ac.jp/idp/profile/SAML2/Redirect/SLO" />
           <SingleLogoutService Binding="urn:oasis:names:tc:SAML:2.0:bindings:HTTP-POST" Location="https://idp.example.ac.jp/idp/profile/SAML2/POST/SLO" />
           <!-- ↑↑↑ ここまで追加 ↑↑↑ -->
           <NameIDFormat>urn:mace:shibboleth:1.0:nameIdentifier</NameIDFormat>
           <NameIDFormat>urn:oasis:names:tc:SAML:2.0:nameid-format:transient</NameIDFormat>
           <SingleSignOnService Binding="urn:mace:shibboleth:1.0:profiles:AuthnRequest" Location="https://idp.example.ac.jp/idp/profile/Shibboleth/SSO"/>
           <SingleSignOnService Binding="urn:oasis:names:tc:SAML:2.0:bindings:HTTP-POST" Location="https://idp.example.ac.jp/idp/profile/SAML2/POST/SSO"/>
           <SingleSignOnService Binding="urn:oasis:names:tc:SAML:2.0:bindings:HTTP-Redirect" Location="https://idp.example.ac.jp/idp/profile/SAML2/Redirect/SSO"/>
         </IDPSSODescriptor>
         <AttributeAuthorityDescriptor protocolSupportEnumeration="urn:oasis:names:tc:SAML:1.1:protocol urn:oasis:names:tc:SAML:2.0:protocol">
<!-- (省略) -->
<SingleLogoutService>とその前後の要素は並び順が決まっていますので注意してください。下記の順番となるように<SingleLogoutService>を追加してください。
- Extensions
- KeyDescriptor
- ArtifactResolutionService
- SingleLogoutService
- ManageNameIDService
- NameIDFormat
- SingleSignOnService
- NameIDMappingService
- AssertionIDRequestService
- AttributeProfile
- Attribute
不足している設定の確認
IdPで2.4.0より前のバージョンで使用していた設定を引き継いでいる場合、設定が不足している場合があります。不足している設定があった場合は追加してください。
relying-party.xml
<DefaultRelyingParty>要素に以下が設定されていること<ProfileConfiguration xsi:type="saml:SAML2LogoutRequestProfile" signResponses="conditional"/>
handler.xml
以下が設定されていること<ProfileHandler xsi:type="SAML2SLO" inboundBinding="urn:oasis:names:tc:SAML:2.0:bindings:HTTP-Redirect" outboundBindingEnumeration="urn:oasis:names:tc:SAML:2.0:bindings:HTTP-Redirect urn:oasis:names:tc:SAML:2.0:bindings:HTTP-POST-SimpleSign urn:oasis:names:tc:SAML:2.0:bindings:HTTP-POST urn:oasis:names:tc:SAML:2.0:bindings:HTTP-Artifact"> <RequestPath>/SAML2/Redirect/SLO</RequestPath> </ProfileHandler> <ProfileHandler xsi:type="SAML2SLO" inboundBinding="urn:oasis:names:tc:SAML:2.0:bindings:HTTP-POST" outboundBindingEnumeration="urn:oasis:names:tc:SAML:2.0:bindings:HTTP-Redirect urn:oasis:names:tc:SAML:2.0:bindings:HTTP-POST-SimpleSign urn:oasis:names:tc:SAML:2.0:bindings:HTTP-POST urn:oasis:names:tc:SAML:2.0:bindings:HTTP-Artifact"> <RequestPath>/SAML2/POST/SLO</RequestPath> </ProfileHandler> <ProfileHandler xsi:type="SAML2SLO" inboundBinding="urn:oasis:names:tc:SAML:2.0:bindings:HTTP-POST-SimpleSign" outboundBindingEnumeration="urn:oasis:names:tc:SAML:2.0:bindings:HTTP-Redirect urn:oasis:names:tc:SAML:2.0:bindings:HTTP-POST-SimpleSign urn:oasis:names:tc:SAML:2.0:bindings:HTTP-POST urn:oasis:names:tc:SAML:2.0:bindings:HTTP-Artifact"> <RequestPath>/SAML2/POST-SimpleSign/SLO</RequestPath> </ProfileHandler> <ProfileHandler xsi:type="SAML2SLO" inboundBinding="urn:oasis:names:tc:SAML:2.0:bindings:SOAP" outboundBindingEnumeration="urn:oasis:names:tc:SAML:2.0:bindings:SOAP"> <RequestPath>/SAML2/SOAP/SLO</RequestPath> </ProfileHandler> <ProfileHandler xsi:type="SAML2SLO" inboundBinding="urn:mace:shibboleth:2.0:profiles:LocalLogout"> <RequestPath>/Logout</RequestPath> </ProfileHandler>
SPの設定
shibboleth2.xmlのSession要素内のLogout要素に以下のように"SAML2"が設定されている必要があります。デフォルト設定ですので、変更していない場合は追加設定は不要です。"SAML2"の部分が削除されている場合は追加してください。
<Logout>SAML2 Local</Logout>
上記設定により、IdPのメタデータに<SingleLogoutService>が定義されている場合には、ログアウト処理でSPのセッションを削除し、IdPのログアウトページへ移動します。 この時、IdP側のセッションも削除されます。定義されていない場合は、ローカルログアウトになり、SPのセッションだけ削除されます。
参考:
SP関連情報
Embedded DS
特定の言語で表示する方法
Embedded DSは、ブラウザの表示言語設定を反映して表示する言語を選びますが、特定の言語で表示したい場合の方法が下記に記載されてます。
DISCOVERY-71 - 課題情報を取得中... ステータス
学認外のIdPを選択できるようにする方法
学認参加のSPで、特例として学認外のIdPを通常のDSの代わりにEmbedded DSのIdPリストに表示させるための方法を記載します。例えば https://meatwiki.nii.ac.jp ではこの方法を使って、ログインするときに表示されるIdPのリストにOpenIdPなどの学認外IdPを追加しています。
- discoveryTemplate.html を /etc/shibboleth に配置します。文言を適当に修正してください。
- Javascriptテンプレートのダウンロード からJavaScript部分だけを抜き出したファイルをドキュメントルート配下(例えば/var/www/html)に js/embedded-wayf_config.js として配置します。
- 環境に合わせて wayf_URL, wayf_sp_entityID, wayf_sp_handlerURL, wayf_return_url を修正してください。
DSのリストに追加したいIdPを wayf_additional_idps に設定してください。例:
var wayf_additional_idps = [
      {name:"OpenIdP",
      entityID:"https://openidp.nii.ac.jp/idp/shibboleth",
      SAML1SSOurl:"https://openidp.nii.ac.jp/idp/profile/Shibboleth/SSO"},
];
- /etc/shibboleth/shibboleth2.xml の設定を変更します。
前出の discoveryTemplate.html を使うようにSessionInitiatorを修正します。
             <SessionInitiator type="Chaining" Location="/DS" isDefault="true" id="DS">
                 <SessionInitiator type="SAML2" template="bindingTemplate.html"/>
                 <SessionInitiator type="Shib1"/>
-                <SessionInitiator type="SAMLDS" URL="https://ds.gakunin.nii.ac.jp/WAYF"/>
+               <SessionInitiator type="Form" template="discoveryTemplate.html"/>
             </SessionInitiator>
embedded-wayf_config.jsのwayf_additional_idpsに追加したIdPのメタデータを読み込むための設定を追加します。事前にIdPのエンティティメタデータを取得して、/etc/shibboleth/metadata/ に配置しておいてください。
<MetadataProvider type="XML" file="metadata/additional_idp-metadata.xml"/>
サーバ証明書
SAML 1のSPおよびSAML 2でBack-Channelを使用するSPの場合
Back-Channel時にSPの証明書を用いてクライアント認証が行なわれることを想定して、ExtenedKeyUsageにclietAuth(TLS Web Client Authentication)を含めたサーバ証明書(もしくはExtendedKeyUsage自体が存在しないサーバ証明書)を用いることを推奨します。
$ openssl x509 -in sp-certificate.pem -noout -text | grep -A 1 'X509v3 Extended Key Usage:'
            X509v3 Extended Key Usage:
                TLS Web Server Authentication, TLS Web Client Authentication
- clientAuth(TLS Web Client Authentication) あり
- serverAuth(TLS Web Server Authentication) あり
Back-Channelを用いて通信を行なうときに下記の証明書を用いた場合にはSPのクライアント認証が受け付けられずにIdPでエラーとする実装があるようです。
$ openssl x509 -in sp-certificate.pem -noout -text | grep -A 1 'X509v3 Extended Key Usage:'
            X509v3 Extended Key Usage:
                TLS Web Server Authentication
- clientAuth(TLS Web Client Authentication) なし
- serverAuth(TLS Web Server Authentication) あり
プロトコル
DSを経由せず強制的に特定のIdPに遷移する方法
Apacheの設定で require valid-user を設定し、そのコンテンツにアクセスした時点でDSへリダイレクトされる、というのが学認における通常のフローかと思いますが、Apacheの設定に以下を追加すればこれが有効な範囲ではDSを経由せずに指定したIdPに直接リダイレクトします。
ShibRequestSetting entityID https://idp.example.ac.jp/idp/shibboleth
この他、以下のようなURLにアクセスさせることで、指定したIdPで認証させた後に指定したURLに遷移させることが可能です。
https://sp.example.ac.jp/Shibboleth.sso/DS?entityID=https%3A%2F%2Fidp.example.ac.jp%2Fidp%2Fshibboleth&target=https%3A%2F%2Fsp.example.ac.jp%2Fsecure%2F
entityID= の部分で(%エンコードされていて分かりにくいですが)、リダイレクトさせたいIdPのentityIDを指定します。
target= には、認証成功後にリダイレクトする先のSP上のURLを指定します。
後者のURL中の"/DS"の部分は、shibboleth2.xmlで<SessionInitiator>要素を追加していない場合は"/Login"となります。
後者のURLにアクセスすると、SPセッションがすでに存在するかどうかに関わらずIdPに遷移します。IdPにてセッションが存在する場合はそのままSPに戻ります。認証成功後はSPのセッションは上書きされます。
なお、サイト全体で特定のIdPのみ対象とする場合、例えば学内サービスのようなものについては、下記ページを参考に当該IdPのみを信頼するように設定してください。
⇒ 学内システムとして構築する場合の設定
オープンリダイレクタとなりうる問題の対処
Shibboleth SPをデフォルトの設定で利用した場合にユーザを任意の外部サイトにリダイレクトすることができるオープンリダイレクタとして機能する問題があります。Shibboleth SP 2.4.2からリダイレクトの問題へ対処するオプションが提供されています。
SP 2.5をご利用の場合は、NativeSPSessions ページの Attributes > redirectLimit を参照してください。
SP 2.4.2/2.4.3での旧オプション名称は relayStateLimit でした。
redirectLimitオプションにはいくつか種類がありますので、各サイトごとに適切なオプションを選択してください。下記に代表的な/etc/shibboleth/shibboleth2.xml の設定例(diff形式)を挙げます。
"exact"を指定することでリダイレクト先のホスト名やポートなどがリダイレクト元のSPと完全に一致するものだけに制限することが可能です。
  @@ -50,7 +50,8 @@
           security of your site. Stealing sessions via cookie theft is much easier with this disabled.
           -->
           <Sessions lifetime="28800" timeout="3600" relayState="ss:mem"
  -                  checkAddress="false" handlerSSL="false" cookieProps="http">
  +                  checkAddress="false" handlerSSL="false" cookieProps="http"
  +                  redirectLimit="exact">

               <!--
               Configures SSO for a default IdP. To allow for >1 IdP, remove
"exact+whitelist"を指定することでホワイトリストを用いたリダイレクト先の制限が可能です。複数のホスト名でVirtual Host設定を行なっている場合に利用することが想定されます。
  @@ -50,7 +50,8 @@
           security of your site. Stealing sessions via cookie theft is much easier with this disabled.
           -->
           <Sessions lifetime="28800" timeout="3600" relayState="ss:mem"
  -                  checkAddress="false" handlerSSL="false" cookieProps="http">
  +                  checkAddress="false" handlerSSL="false" cookieProps="http"
  +                  redirectLimit="exact+whitelist" redirectWhitelist="https://service1.example.ac.jp/ https://service2.example.ac.jp/">

               <!--
               Configures SSO for a default IdP. To allow for >1 IdP, remove
リダイレクトを制限するためのオプションが追加された経緯については下記のリンクを参照ください。
Shibboleth SP 2.5.0からの新機能
WebアプリケーションのログアウトフローへのShibbolethログアウト処理の挿入
Shibboleth SP 2.5より requireLogoutWith が実装されました。 requireLogoutWith では指定されたURL(通常はShibbolethのログアウトURLを指定)に遷移したのちに、元のページの戻るといった処理が自動的に行なわれます。
Shibboleth認証になっているパス(例えば /secure )の中にWebアプリケーションのログアウト処理のページを用意します。ログアウト処理ページは仮に /secure/logout とします。
Apacheの設定
$ cat /etc/httpd/conf.d/shib.conf
(...略...)
<Location /secure>
  AuthType shibboleth
  ShibRequestSetting requireSession 1
  require valid-user
</Location>
Webアプリケーションのログアウト処理ページ /secure/logout に対して次のApacheの設定を追加すると requireLogoutWith に指定されている /Shibboleth.sso/Logout にてShibbolethセッションの破棄と /secure/logout によるWebアプリケーションのログアウト処理が一連の動作として行なわれます。
<Location /secure/logout>
  require shibboleth
  ShibRequestSetting requireSession false
  ShibRequestSetting requireLogoutWith "/Shibboleth.sso/Logout"
</Location>
requireLogoutWith に関する詳細は https://wiki.shibboleth.net/confluence/display/SHIB2/NativeSPContentSettings をご参照ください。
SP 2.5.0では /secure/logout のURLに適当なパラメータを与えた場合に正しく処理されない問題が確認されています。例えばログアウトページへのパラメータを与えるために /secure/logout?param=aaa といったURLにアクセスした場合に param=aaa の後ろが「&」で区切られず、最終的にリダイレクトされるURLが /secure/logout?param=aaashiblogoutdone=1 となります。(param=aaa を与えない場合は /secure/logout?shiblogoutdone=1 となります)。
この問題は SP 2.5.1 で修正されていますので、SP 2.5.1以降のご利用をおすすめいたします。 https://issues.shibboleth.net/jira/browse/SSPCPP-518
Attribute Checker Handler
Shibboleth SP 2.5よりAttribute Checker Handlerが実装されました。同じくShibboleth SP 2.5からの機能であるsessionHookと合わせて利用することで、IdPから必要な属性が渡されているかチェックすることができます。ApplicationDefaultsの属性としてsessionHookを設定し、Sessionsの末尾にAttribute Checker Handlerを追加することでこの機能を利用できます。
NativeSPHandlerのページに倣い、SPでeduPersonPrincipalNameとdisplayNameの属性を必須とする場合の具体的な書き方を例示します。
ApplicationDefaultsにsessionHookの設定を追加(共通)
     <ApplicationDefaults id="default" policyId="default"
         entityID="https://sp.example.ac.jp/shibboleth-sp"
         REMOTE_USER="eppn persistent-id targeted-id"
-        signing="false" encryption="false">
+        signing="false" encryption="false" sessionHook="/Shibboleth.sso/AttrChecker">
- Sessionsの末尾にAttribute Checker Handlerを追加(利用用途に合わせて選択)
eduPersonPrincipalNameとdisplayNameの属性を必須とする(AND条件)
         <Sessions>
                (...略...)

            <!-- Checks for required attribute(s) before login completes. -->
            <Handler type="AttributeChecker" Location="/AttrChecker" template="attrChecker.html"
                attributes="eppn displayName" flushSession="true"/>

         </Sessions>
もしくは以下の書き方でも可
         <Sessions>
                (...略...)

           <!-- Checks for required attribute(s) before login completes. -->
           <Handler type="AttributeChecker" Location="/AttrChecker" template="attrChecker.html"
                   flushSession="true">
               <AND>
                   <Rule require="eppn"/>
                   <Rule require="displayName"/>
               </AND>
           </Handler>

         </Sessions>
eduPersonPrincipalNameとdisplayNameのどちらか一方の属性を必須とする場合(OR条件)
         <Sessions>
                (...略...)

            <Handler type="AttributeChecker" Location="/AttrChecker" template="attrChecker.html"
                    flushSession="true">
                <OR>
                    <Rule require="eppn"/>
                    <Rule require="displayName"/>
                </OR>
            </Handler>

         </Sessions>
チェック対象の eppn や displayName といった属性名は /etc/shibboleth/attribute-map.xml で定義されている内容に従って記述する必要があります。
この他に template="attrChecker.html" の部分に template="/var/www/html/Error.html" のようにローカルのファイルを指定することで、Attribute Checkerによって表示されるエラーページを変更することも可能です。
Attribute Checker Handlerに関する詳細は https://wiki.shibboleth.net/confluence/display/SHIB2/NativeSPHandler#NativeSPHandler-AttributeCheckerHandlerVersion25andAbove をご参照ください。
SSLアクセラレータを挟む構成に関する参考情報
Shibboleth SPの前段にSSLアクセラレータを挟む場合、Shibboleth SPが動作しているサーバのホスト名と外から見えるホスト名が異なっていたり、接続を受けるポート・スキーム(HTTP/HTTPS)が異なっていたりすることで問題になる場合があります。
学認情報交換MLの以下から始まるスレッドを参考にApacheおよびShibboleth SPの設定をご確認ください。
- [upki-fed:00386] IdPとのSP接続確認のエラーについて
- [upki-fed:276] SSLアクセラレータ環境
さらなる情報は、Shibboleth開発元が提供している下記ページ(英語)をご参照ください。
- Deploy the Service Provider behind a Reverse Web Proxy
https://wiki.shibboleth.net/confluence/display/SHIB2/SPReverseProxy
※SSLアクセラレータは"SSL offloading"と表現されています。SSLアクセラレータ自身に対する設定も記述されていますが、読み飛ばしてください。
未確認ながら、ソースIPアドレスがSSLアクセラレータのものに固定されることによって、shibboleth2.xmlの設定で checkAddress="true" としていると問題が発生すると思われますのでご注意ください。また、consistentAddress="true" は期待する動作をしない(常にconsistentであると判定され、セッションが切断されない)と思われます。
DS関連情報
PHP
CentOS 5標準のphpパッケージを用いた場合に/WAYF/IDProviders.jsonにアクセスするとエラー
CentOS 5標準のphpパッケージはPHP 5.1系であるため、GakuNinDSの https://ds.example.ac.jp/WAYF/IDProviders.json にアクセスすると下記のエラーが出力されます。
Fatal error: Call to undefined function json_encode() in /var/www/html/GakuNinDS/WAYF on line 668
このエラーはPHP 5.1に関数json_encode()が存在しないために出力されるものです。json_encode()はPHP 5.2以降でサポートされていますので、CentOS 5のパッケージとして提供されているphp53パッケージ(PHP 5.3)を用いることで解決します。
PHP 5.3以降でのTimezoneに関するエラー
CentOS 5のphp53パッケージやCentOS 6のphpパッケージなど、PHP 5.3以降を使用しているマシンでGakuNinDSを動かすときには、httpdのエラーログに下記の警告が出力されることがあります。
[Fri Mar 09 15:26:17 2012] [error] [client xxx.xxx.xxx.xxx] PHP Warning: date(): It is not safe to rely on the system's timezone settings. You are required to use the date.timezone setting or the date_default_timezone_set() function. In case you used any of those methods and you are still getting this warning, you most likely misspelled the timezone identifier. We selected 'Asia/Tokyo' for 'JST/9.0/no DST' instead in /var/www/html/GakuNinDS/functions.php on line 484, referer: https://sp.exapmle.com/
上記の警告が出力されていてもGakuNinDSの動作には問題ありませんが、下記のように/etc/php.iniにてdate.timezoneを定義することでこの警告は出力されなくなります。
--- php.ini     2012/06/18 08:12:14     1.1
+++ php.ini     2012/06/18 08:19:26
@@ -943,7 +943,7 @@
 [Date]
 ; Defines the default timezone used by the date functions
 ; http://www.php.net/manual/en/datetime.configuration.php#ini.date.timezone
-;date.timezone =
+date.timezone = "Asia/Tokyo"

 ; http://www.php.net/manual/en/datetime.configuration.php#ini.date.default-latitude
 ;date.default_latitude = 31.7667

