...
Save as "wv-1.2.4.tar.gz" to get the source code from https://sourceforge.net/projects/wvware/files/wv/1.2.4/.
| コード ブロック | ||
|---|---|---|
| ||
sudo yum -y install glib2-devel libgsf libgsf-devel gcc gcc-c++ elinks sudo tar -zxvf wv-1.2.4.tar.gz cd wv-1.2.4/ sudo ./configure sudo make sudo make install |
...
| コード ブロック | ||
|---|---|---|
| ||
wget -c "http://www.netcommons.org/%E3%83%80%E3%82%A6%E3%83%B3%E3%83%AD%E3%83%BC%E3%83%89/%E3%82%B3%E3%82%A2%E3%83%91%E3%83%83%E3%82%B1%E3%83%BC%E3%82%B8/?action=cabinet_action_main_download&block_id=93&room_id=1&cabinet_id=1&file_id=2811&upload_id=6210" -O netcommons-2.4.2.1.tar.gz |
Uncompress the downloaded file.
...
Download the latest stable WEKO from the code repository.
| コード ブロック | ||
|---|---|---|
| ||
wget -O weko.tar.gz https://bitbucket.org/niijp/weko/get/master.tar.gz |
Download multilingual WEKO from the code repository as well, then copy it to the NC2 module directory.
| コード ブロック | ||
|---|---|---|
| ||
svntar co http://forge.at.nii.ac.jp/svn/nc/repository/trunkzxvf weko.tar.gz mv niijp-weko-[commit number] repository sudo cp -rp repository /var/www/html/nc2/webapp/modules/ sudo chown -R apache:apache /var/www/html/nc2/webapp/modules/repository |
...
If you can find the word "Succesfully installed." at the end of the install log, congratulations!
Installation WEKO into the NC2 has been completed.
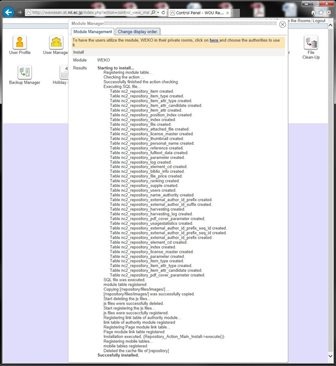
Completed!
Show WEKO Block
Go to the NC2 top page and click "Setting mode on" link in the header.
After switching to the Setting Mode, you can select WEKO module in the drop down menu.
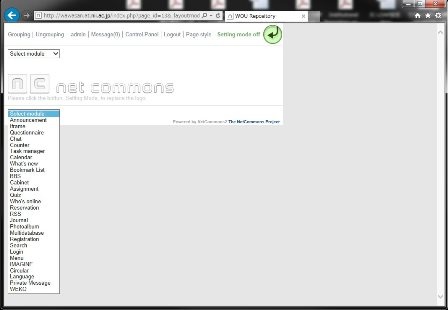
Now you paste WEKO module on the top page. Here is the control panel page of WEKO.
In order to show the language select function, please click the "management" tab.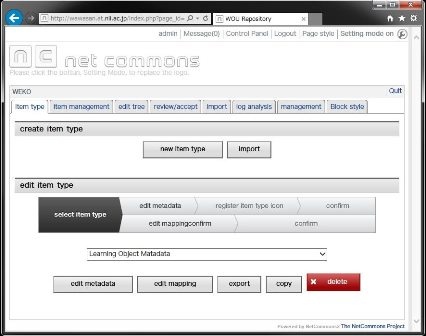
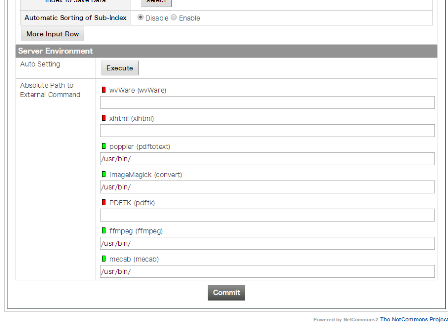
Setting up for the External Commands
In the [Management] => [Server Setting] tab, you can find "Server Environment" menu.
Clicking the [Execute] button automatically search the commands and change signal color to green if the system has.
In order to store the path to the commands, click the [Commit] button after this operation.
Finish!
...
Customization for Multilingual
Only English, Chinese and Japanese are available by the original NC2. Therefore, we need to apply patch for more multilingual function. First you need to checkout the patch and just copy it to the NC2 application directory.
| コード ブロック | ||
|---|---|---|
| ||
wget -O nc2multilang.tar.gz https://bitbucket.org/niijp/nc2-patch-multilanguage/get/master.tar.gz
tar zxvf nc2multilang.tar.gz
cd niijp-nc2-patch-multilanguage-[commit number]

sudo cp -rp webapp /var/www/html/nc2/ |
MySQL DB also have to be modify for this customization.
In this SQL file database prefix for NC2 is assumed as "nc2" as has been instructed previously.
If you apply different prefix, please modify SQL file appropriately.
| コード ブロック | ||
|---|---|---|
| ||
mysql -u nc2user -pnc2pass
mysql> use nc2db
mysql> source AddLanguageForNC2SQL.sql |
Completed!
Show WEKO Block
Go to the NC2 top page and click "Setting mode on" link in the header.
After switching to the Setting Mode, you can select WEKO module in the drop down menu.
Now you paste WEKO module on the top page. Here is the control panel page of WEKO.
Setting up for the External Commands
In the [Management] => [Server Setting] tab, you can find "Server Environment" menu.
Clicking the [Execute] button automatically search the commands and change signal color to green if the system has.
In order to store the path to the commands, click the [Commit] button after this operation.
Setting up for the Language Selection
In order to show the language select function, please click the "management" tab.
In the [management] => [display setting] tab, you can find "language setting" menu.
In this menu, that is, [language setting] => [select language setting], please select "Display" (default is "Hide") from the drop down list.
Then click "commit" button at the bottom of the page.
You can exit from the control panel by clicking "Quit" link at the right hand side of the WEKO block header.
For multilingual, web page for each language have to be prepared by the following procedure.
- As same as showing the WEKO block, go to Setting Mode and show language and menu module.
- In the language module, select the language which can to be selected in your page.
- After selecting an language, create a new page under the public space by using the menu module.
- In the page created in 2, show WEKO block.
- Same procedure have to be repeated for other language.