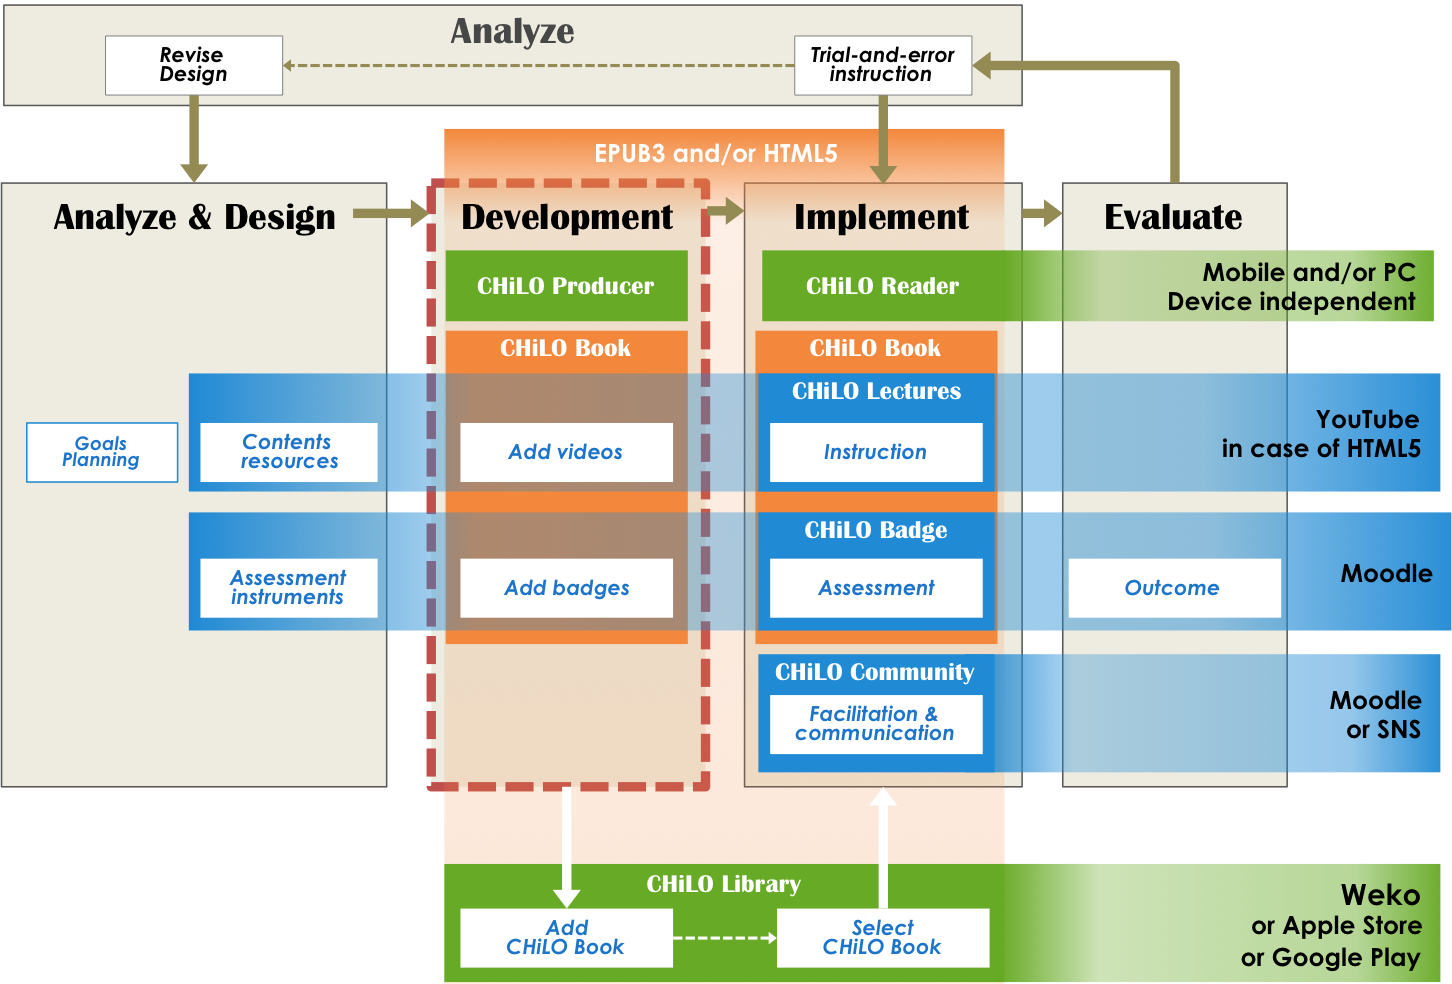
目次 style circle
Demonstration video: How to create CHiLO
...
Book
| ウィジェット コネクタ | |
|---|---|
|
...
|
...
|
...
|
...
1. Add badges
CHiLO Bookの学習成果は、Moodleのデジタルバッジの取得状況によって把握します。You can assess the status of the learning outcomes of CHiLO Books from the Moodle digital badges.
The badge issued for each CHiLO Book is called a "small badge", and the badge issued after earning all the badges of the series or badges of specified CHiLO Books is called a "big badge".
1) 評価の方法を決定するDecide the way of assessment.
Moodle badges will be issued when the activity module is completed, which means; achieving passing scores in the Quiz activity module, handing in reports in the Assignment activity module, or posting messages in the Forum activity module. To activate the activity module, there is a need to set the Completion tracking to "ON" on each activity module. But first of all, decide the activity module that best fits the CHiLO Book you are creating.Moodleのバッジは、the Quiz activity moduleで合格点を取得した、the Assignment activity moduleでレポートを提出した、the forum activity moduleに投稿したなど、あらかじめCompletion trackingが設定されているactivity moduleを完了すると発行されます。まずは、作成するCHiLO Bookに適したactivity moduleを決定してください。
| 情報 |
|---|
learn more... https://docs.moodle.org/23/en/Activity_completion_settings |
2) Activity moduleを追加する
activity moduleが決定したら、Moodleにコースを作成し、activity moduleを追加してください。1冊のCHiLO Bookに複数のactivity moduleを指定し、バッジ発行の条件をより詳細に指定できますが、Moodleの1つのコースには、CHiLO Book1冊分のactivity moduleのみ追加するようにします。
Add activity module
After deciding the activity module, create a course in Moodle, then add the activity module. You can specify the conditions for issuing the badge by adding multiple activity modules but it is only valid for one CHiLO Book for one Moodle course is equivalent to one CHiLO Book.
3) Setting of badge issuing3) バッジ発行 の設定をする
The small badge is equivalent to the course badge issued in Moodle. As for the big badge, equivalent to the site badge of Moodle.
...
| 情報 |
|---|
learn more... https://docs.moodle.org/29/en/Using_badges#Adding_a_course_badge |
4) 作成したactivity moduleのURLを記録するSave the URL of the created activity module
There is a need to enter the URL of the created activity module on to the CHiLO Producer Spreadsheet which is to be explained later on, so save the URL of the view page of the activity module.後で説明する、the CHiLO Producer Spreadsheetに記載しますので、作成したactivity moduleのビューページのURLを記録します。
| ヒント |
|---|
| ビューページのURLとは、View page URL is the URL which includes "view.php" as in [http://xxx.xxx.xx/mod/xxx/view.php?id=xxxxxのように、"view.php" が含まれるページ のURLです。xxxxx]. |
...
2. Create CHiLO Books
CHiLO Book can be created using CHiLO producer. CHiLO Producer is open source software and a java command line application for producing CHiLO Books.
...
CHiLO Producer Operating environment
| 情報 |
|---|
|
Download CHiLO Producer from GitHub
| 情報 |
|---|
chilo-producer-master folder
Unzip CHiLO Producer downloaded from GitHub and you will find the following folders under the GitHubからダウンロードしたCHiLO Producerを解凍すると、"chilo-producer-master" フォルダの下に次のフォルダが作成されます。 folder.
| 情報 |
|---|
chilo-producer-master ( 省略)abbr.) │ └ scripts * scripts used in common │ ├ epub3 * Template for EPUB3 CHiLO Book │ ├ ext-epub3 * Template for ext. EPUB3 CHiLO Book │ └ web * Template for web CHiLO Book │ series /_english * Sample of CHiLO Book series series /_english * Template of the series folder: copy this folder to create (Japanese) |
2-1.
...
Creating work folder
1) Creating "chilo-producer-master/chiloPro/name of your folder" の作成
Copy "chilo-producer-master/chiloPro/template-series_english" to "chilo-producer-master/chiloPro/" with the name of your folder.
このフォルダ:がCHiLO Bookを作成するための作業用フォルダになります。This folder is the work folder for creating CHiLO Books.
2) Create vol-xフォルダの作成x folder
i. Copy "vol-n" folder in the "chilo-producer-master/chiloPro/name of your folder", according to the number of CHiLO Books in the series.
ii. Change a name of "vol-n" folders you had copied to vol-1,vol-2,vol-3・・・.
2-2. Save and/or upload CHiLO Lecture
1) Save CHiLO Lectureの保存Lectures
Save the CHiLO Lectures, explanation texts and figures created in the Design step to each videos, texts, and images folder of each CHiLO Book work folder; volDesignのステップで作成した、CHiLO Lecture、Explanation text、Figureを作業用フォルダのvol-1, vol-2, vol-3・・・のvideosフォルダ、textフォルダ、imagesフォルダにCHiLO Book毎にそれぞれ保存します。
2) Upload CHiLO Lecture
i. In the case of the Web version CHiLO Book, they are delivered by the video-sharing website such as YouTube.
ii. Also, it is essential to enter video-id of each video you uploaded to the CHiLO Producer Spreadsheet, so you have to keep records of the uploaded video.
| ヒント |
|---|
| https://www.youtube.com/watch?t=5&v=YrAdO44ezh8 → "YrAdO44ezh8" is the video-id for YouTube. |
2-3. その他のresources の保存
以下の表は、CHiLO Bookの制作に必要なリソースです。カバーイメージや著者イメージなど、CHiLO Lecture以外のリソースを、以下の表に従って保存します。
Learning Resources
3, ....
Also, prepare thumbnails for CHiLO Lectures and save them in the images folder of each CHiLO Book.
| Resource | Details | Location to save the learning resources | Example | |||||
|---|---|---|---|---|---|---|---|---|
| A. Image of the author [optional] | The image will be displayed on the "About the Author" page. Resolution: 159x159 JPEG format(Recommended) | chilo-producer-master/chiloPro/common/authorImages/ | 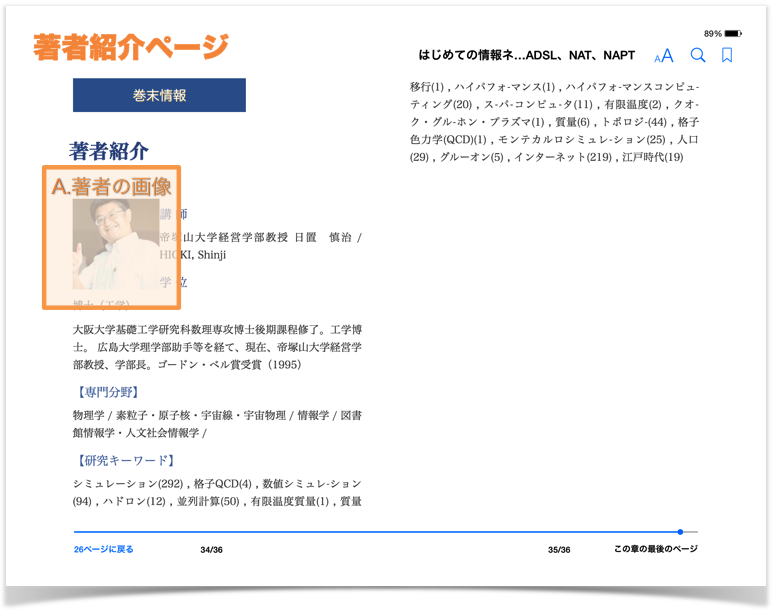 | |||||
| B. Image of section cover [required] | Image for display on the inside cover of the section throughout the series. Resolution: 1024x600 JPEG format(Recommended) | chilo-producer-master/chiloPro/name of your folder/common/images/ | ||||||
| C. Cover [required] | Cover image of the Book Resolution:768x1024 JPEG format(Recommended) | chilo-producer-master/chiloPro/name of your folder/vol-x/images/ * | CHiLO Lectureに関するリソース | D. CHiLO Lecture (video) [required] | Video of the CHiLO Lecture. The recommended length of the video is 1-2 minutes. Compress as much as possible in order to embed in EPUB3 format CHiLO Book. Frame rate: 29.97 Bit rate: 384kbps Size: 480x360(4:3) or 560x316(16:9) | chilo-producer-master/chiloPro/name of your folder/vol-x/videos/ * | ||
| EB. video Video thumbnail [optionalrequired] | Thumbnail of the video. Same size as the video JPEG format (recommended) | chilo-producer-master/chiloPro/name of your folder/vol-x/images/ * | ||||||
| C. Explanation text [required] | Text displayed below the explanation video. Prepared in extension(.xhtml)text file. | chilo-producer-master/chiloPro/name of your folder/vol-x/text/ * | ||||||
| D. Figure [optional] | Embed figures to explain text such as diagrams, charts, graphs and illustration. Recommended resolution: 1024 | chilo-producer-master/chiloPro/name of your folder/vol-x/images/ * |
* vol-x : x indicates the volume of the CHiLO Book.
2) Upload CHiLO Lecture
i. Web version CHiLO Book are delivered by the video-sharing website such as YouTube.
ii. Also, it is essential to enter video-id of each video you uploaded to the CHiLO Producer Spreadsheet, so you have to keep records of the uploaded video.
| ヒント |
|---|
| https://www.youtube.com/watch?t=5&v=YrAdO44ezh8 → "YrAdO44ezh8" is the video-id for YouTube. |
2-3. Save the cover image
Save the image file of the book cover and the section cover (inside cover).
Learning Resources
| Resource | Details | Location to save the learning resources | Example |
|---|---|---|---|
| E. Image of book cover [required] | Cover image of the Book Resolution:768x1024 JPEG format(Recommended) | chilo-producer-master/chiloPro/name of your folder/vol-x/images/ * | |
| F. Image of section cover [required] | Image for display on the inside cover of the section throughout the series. Resolution: 1024x600 JPEG format(Recommended) | chilo-producer-master/chiloPro/name of your folder/common/images/ |
* vol-x : x indicates the volume of the CHiLO BooksBook.
2-4. Create structure-books.
...
xlsx
Enter CHiLO Book structure to chilo-producer-master/chiloPro/name of your folder/structure-books.xlsxに、CHiLO Bookの構造を入力します。
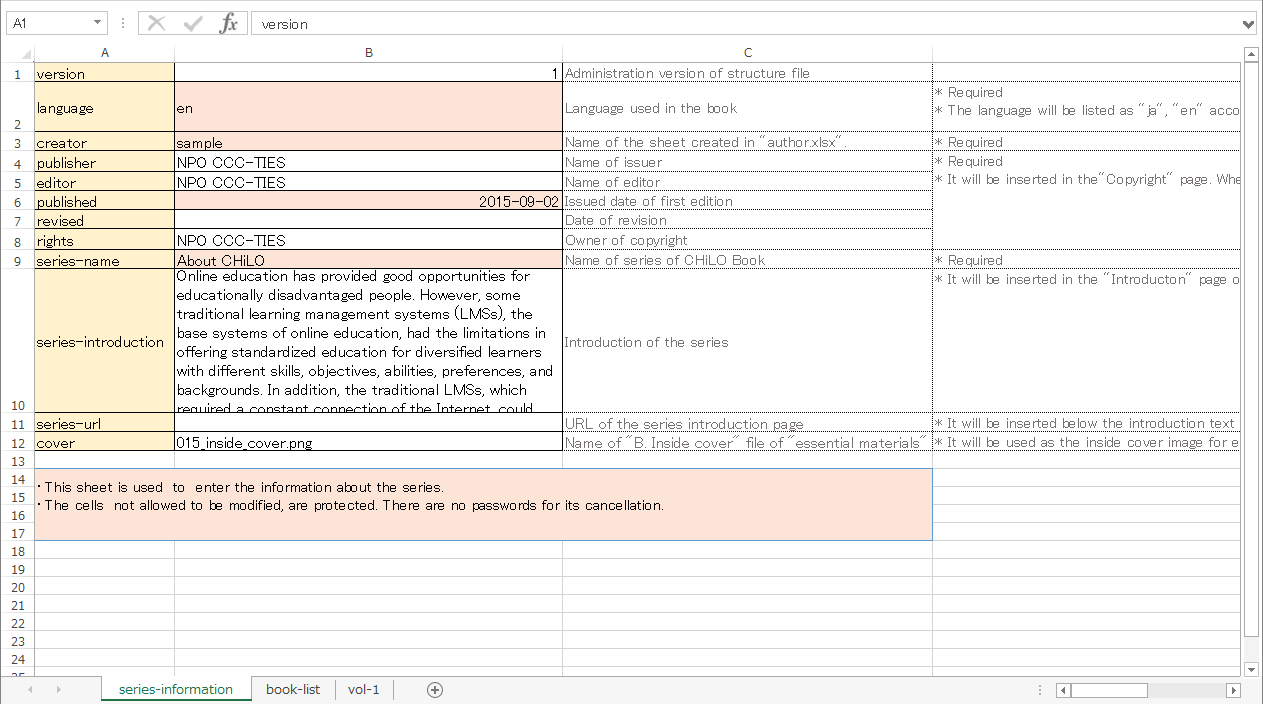
1) "series information" sheet
Configure the information concerning the series.
Main settings
language : Language tag such as "ja", "en" defined by RFC 5646
creator : Name of the sheet created in the "author.xlsx" which is to be explained later.
published : Issued date of first edition
rights : Owner of copyright
シリーズの名称: series-name , 学習ゴールなどのシリーズの紹介:series-introductionなど、シリーズに関する情報を入力します。: Name of series of CHiLO Book
series-introduction: Introduction of the series
series-url: URL of the site introducing the series, if any.
cover : Name of "F. Image of section cover" file. Not the book cover of CHiLO Book.
2) "Book-list" sheet
シリーズに含まれるCHiLO Bookのタイトルと、各CHiLO Bookのカバーイメージなどをvol-1から順に記入します。
List of CHiLO Books included in the series
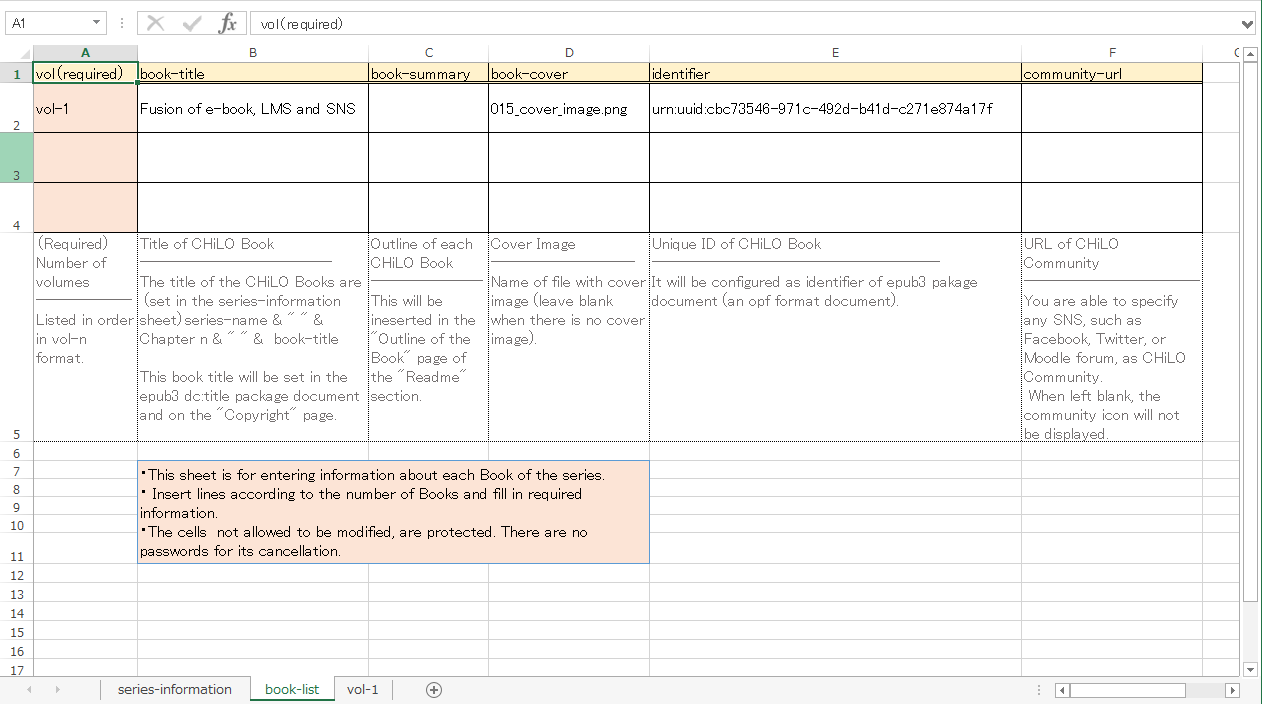
Main settings
vol : Number CHiLO Books in the series; vol-1, vol-2, vol-3 and so on, in order.
book-title : Title of CHiLO Book
book-summary : Outline of CHiLO Book
cover : Name of "E. Image of book cover" file. The file name of the cover image of CHiLO Book
identifier : For uniquely identifying CHiLO Book, enter "urn:uuid:" + UUID (Universally Unique Identifier)
e.g. urn:uuid:a7c4eab7-1540-47bd-9302-7fda5df5c54e
| 情報 | ||
|---|---|---|
| ||
For windows
For Unix-like OS Run the following command utilizing command prompt. > uuidgen |
32) "vol-x" sheet
i. シリーズのCHiLO Bookの数だけ、vol-nシートをコピーして、volCopy the vol-n sheet according to the number of CHiLO Books in the series and alter the sheet name to vol-1,vol-2・・・とシート名を変更します。2...
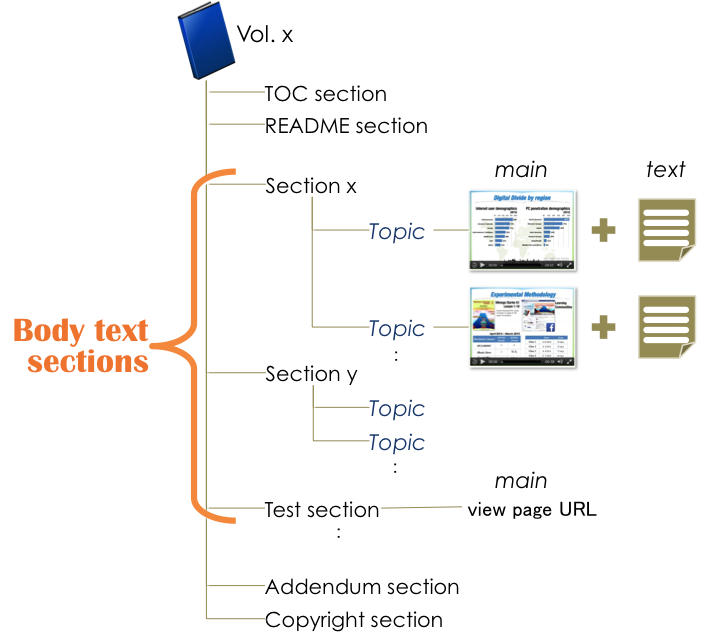
ii. コピーしたvol-xシートに、CHiLO Lectureの情報を入力していきます。Enter information of the pages to be created in the Body text-section of the CHiLO Book using one row per page from the top.
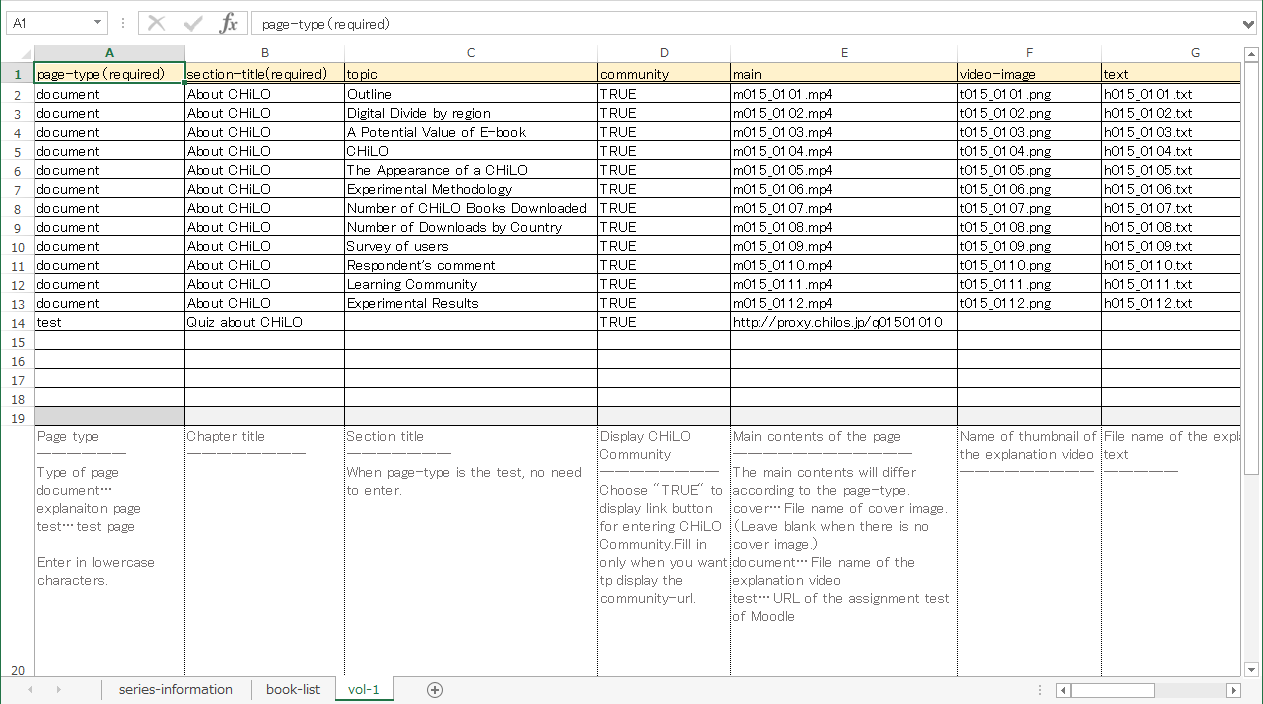
Main settings
page-type : CHiLO Lectureのpage-typeは"document"です。
Section : CHiLO Lectureのセクション名を入力します。
Topics : CHiLO Lectureに対応するTopicを順に入力していきます。
File name of the video : 保存したCHiLO Lectureのビデオのファイル名を入力します。
File name of the explanation text : 保存したthe explanation textのファイル名を入力します。
Video ID : Web version CHiLO Bookを作成する場合は、 video-sharing websiteにアップロードしたビデオのIDを入力します。

2-5. author.xlsxの作成
▶ chilo-producer-master/chiloPro/common/author.xlsx
Select "document" for embedding CHiLO Lectures. Select "test" for assessment of learning outcomes using Moodle activity module.
section-title :Enter the section name of the page.
page-title : The page title is the topic of the CHiLO Lecture.
community: Currently not in use.
main: When the page type "document" is selected, enter the video file name of the CHiLO Lecture.
When the page type "test" is selected, enter the URL of the view page of the Moodle activity module.
text : Enter the file name of the explanation text corresponding to the CHiLO Lecture.
video-id: Enter when creating web version CHiLO Book. Enter ID of the video uploaded on the video-sharing website.
2-5. Author information
Configure information which displays on the "About the Author" page in Addendum section is created by referring to the [author.xlsx] sheet. This spreadsheet of Addendum section. The information configured here will be referred to by all the CHiLO Books created under the chiloPro folder.
1)Save image of the author
Learning Resources
| Resource | Details | Location to save the learning resources | Example |
|---|---|---|---|
| E. Image of the author [optional] | The image will be displayed on the "About the Author" page. Resolution: 159x159 JPEG format(Recommended) | chilo-producer-master/chiloPro/common/authorImages/ | |
* vol-x : x indicates the volume of CHiLO Book.
2) Create author.xlsx
i. Copy "series-infomation" sheet of chilo-producer-master/chiloPro/common/author.xlsx and name the sheet with an easy-to-recognize name.
| 注意 |
|---|
Match the sheet name with the one entered in "creator" of the [series-infomation] sheet of structure-books.xlsx. |
ii. Enter author information.

2-6. Output CHiLO Book
...
CHiLO Producer can output two types of CHiLO Books: EPUB3 format EPUB3 CHiLO Book and HTML HTML5 format Web CHiLO Book.
Run the following Java command utilizing command prompt.
...
CHiLO Book is output to chilo-producer-master/OutputBase/name of your folder/
...
| コード ブロック | ||
|---|---|---|
| ||
*** To output EPUB CHiLO Book **** > run.bat -c <name of your folder> -t epub (Windows) > sh run.sh -c name_<name of_your_folder *Windows sh your folder> -t epub (Unix-like OS) *** To output Web CHiLO Book **** > run.bat -c <name of your folder> -t web (Windows) > sh run.sh -c name_<name of_your_folder * your folder> -t web (Unix-like OS ) |
command line option:
...
-t type of CHiLO
...
Book
| 注意 |
|---|
Once you issue run a command, the former CHiLO Book will be overwritten, so save it if necessary. When If you failed to output CHiLO Book, refer to Common errors. |
...
3. Check the output CHiLO Book
▶ EPUB3 CHiLO Book
The output EPUB3 CHiLO Book can be found in chilo-producer-master/OutputBase/name of your folder/epub3.
The contents of the output EPUB3 CHiLO Book may be confirmed using the following ebook reader. However, CHiLO Community, meaning the link to SNS, may not be confirmed. Follow the steps to deploy, explained in the next chapter and confirm it by using CHiLO Reader.
- For For iOS, Mac OS: iBooksFor Android: Gitden EPUB3 Book Reader
- For Windows,Linux:
...
- Radium
▶ Web CHiLO Book
The output Web CHiLO Book vol-x/nav.html of the OutputBasecan be found in chilo-producer-master/OutputBase/name of your folder/html
vol-x/nav.html is the contents page of the web CHiLO Book. Confirm using the Web browser.
You will not be able to check Web web CHiLO Book in local environment in the following cases:
- When explanation videos are videos uploaded to YouTube
- When there is an input on in fb-app-id of [series-infomationinformation] sheet of chiloPro/SeriesName/structure-books.xlsx
In these cases, check by uploading Web CHiLO Book files to the remote server or run the web server in local environment.