Purpose
The purpose of this document is to install and validate the local mAP environment.
Environment
Following environment is required for installing local mAP.
Table 2‑1 Required Software
Software Name | Version | Notes |
CentOS (64bit) | 6.5 | Operating System |
Shibboleth-SP | 2.5.3 (*1) | Service Provider |
Shibboleth-IdP | 2.4.0 | Identity Provider |
Apache HTTP Server | 2.2.15 (*1) | WEB Server |
Java | JDK 7 Update 45 or openjdk 1.6.0 | IdP Executable Environment |
Apache Tomcat | 6.0.24 (*1) | Servlet Container |
MySQL | 5.1.71 (*1) | Relational Database |
Postfix | 2.6.6 (*1) | Mail Transfer Agent |
PHP | 5.3.3 (*1) | Programing Language |
*1 Latest version of yum package as of 2014/2/28
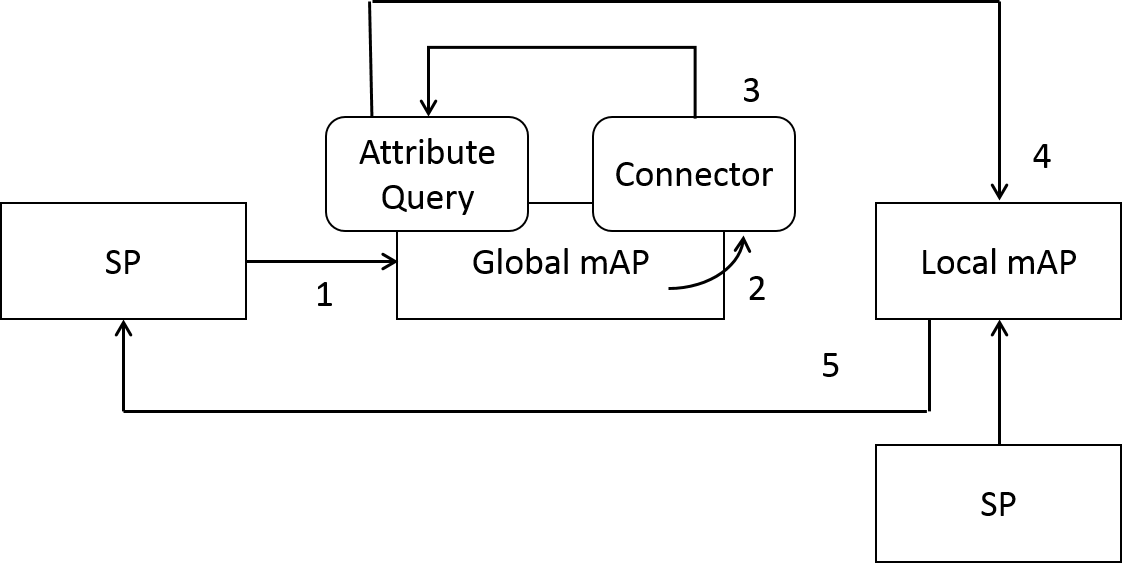
Flow of Request
Installing Shibboleth SP
Please install shibboleth SP while referring to the install guide.
Shibboleth SP Install Guide
https://meatwiki.nii.ac.jp/confluence/display/GakuNinShibInstallen/SP+Install
In addition to shibboleth SP, apache, mod_ssl and NTP will be install simultaneously. Please setup these environment as well.
Installing Shibboleth IdP
Please install shibboleth IdP while referring to the install guide.
Shibboleth SP Install Guide
https://meatwiki.nii.ac.jp/confluence/display/GakuNinShibInstallen/IdP+Install+Manual
In addition to shibboleth IdP, Java and Tomcat will be install as well. Please setup these environment as well.
Installing and Setting Up MySQL
Install MySQL by using following command.
$ sudo yum install mysql-server
* If the MySQL has already been installed as the initial component, you can skip this process.
Setup /etc/my.cnf
[mysqld]
datadir=/var/lib/mysql
socket=/var/lib/mysql/mysql.sock
user=mysql
symbolic-links=0

old_passwords=1
default-character-set = utf8

[mysqld_safe]
log-error=/var/log/mysqld.log
pid-file=/var/run/mysqld/mysqld.pid

[mysql]
default-character-set = utf8
Execute
$ sudo /etc/init.d/mysqld start
$ sudo chkconfig mysqld on
Create Database
$ mysql -u root
CREATE DATABASE vo;
GRANT ALL PRIVILEGES ON vo.* TO 'vouser'@'localhost' IDENTIFIED BY 'YOUR OWN PASSWORD';
Installing and Setting Up PHP
Please install PHP by using following command.
$ sudo yum install php
$ sudo yum install php-devel php-gd php-mbstring php-pdo
$ sudo yum install php-mysql php-xml
$ sudo /etc/init.d/httpd restart
$ sudo yum install php
$ sudo yum install php-devel php-gd php-mbstring php-pdo
$ sudo yum install php-mysql php-xml
$ sudo /etc/init.d/httpd restart
Setting Up Timezone
Add timezone in /etc/php.ini . Parameter “Asia/Tokyo” should be changed depending on your local time.
date.timezone = "Asia/Tokyo"
Installing and Setting Up Mail Server
Please install and setup mail server by using Postfix or Sendmail. Following instruction is for Postfix.
Install
$ sudo yum install postfix
Setup Postfix
Please modify parameters depending on your local environment.
/etc/postfix/main.cf
Execute
$ sudo /etc/init.d/postfix start
$ sudo chkconfig postfix on
Installing Attribute Provider (SP)
Shibboleth SP which has been installed in section 4 will be configured for Attribute Provider.
Download required file from following URL.
https://forge.gakunin.nii.ac.jp/svn/GakuNinmAP/local-map/sp-conf/ Please obtain an account from GakuNin Office if authentication is requested. attribute-map.xml |
Modify Setting
- attribute-policy.xml
Modify “Host Name of the SP” to this server host name. shibboleth2.xml
Modify “Host Name of the IdP” to your university IdP which authenticate users.
Certificate and Key files in the “CredentialResolver” also have to be changed depending on theにserver certificate.
Initial Setting of the CredentialResolver<CredentialResolver type="File" key="cert/server.key" certificate="cert/server.crt"/>
* Owner of these files have to be changed as shibd.
- embedded-wayf_config.js
Modify “Host Name of the Server” to the name of this server.
Values in wayf_additional_idps also have to be changed.
Copy Files
Back Up First
$ sudo cp /etc/shibboleth/attribute-map.xml /etc/shibboleth/attribute-map.xml.bk
$ sudo cp /etc/shibboleth/attribute-policy.xml /etc/shibboleth/attribute-policy.xml.bk
$ sudo cp /etc/shibboleth/shibboleth2.xml /etc/shibboleth/shibboleth2.xml.bk


Then Copy
$ sudo cp attribute-map.xml /etc/shibboleth/.
$ sudo cp attribute-policy.xml /etc/shibboleth/.
$ sudo cp shibboleth2.xml /etc/shibboleth/.
$ sudo mkdir /var/www/html/secure
$ sudo cp attr.php /var/www/html/secure/.
$ sudo mkdir /var/www/html/js
$ sudo cp embedded-wayf_config.js /var/www/html/js/.
Metadata Deployment
- Store the metadata of the SP of this server in the following location.
/etc/shibboleth/metadata/sp-metadata.xml - Store the metadata of this IdP of this server in the following location.
/opt/shibboleth-idp/metadata/idp-metadata.xml
* shibd have to be restarted after the “10. Installing Attribute Provider (IdP)”since the metadata※of the IdP is not yet generated at this moment. - Store the metadata of the IdP which utilizes university authentication.
/etc/shibboleth-idp/metadata/uni-idp-metadata.xml - Federation Metadata
If required, federation metadata have to be included by the shibboleth2.xml configuration.
Restart
$ sudo /etc/init.d/shibd restart$ sudo /etc/init.d/httpd restart
Installing Attribute Provider (IdP)
Shibboleth IdP which has been installed in section 5 will be configured for Attribute Provider.
Download required file from following URL.
https://forge.gakunin.nii.ac.jp/svn/GakuNinmAP/local-map/idp-conf/
Please obtain an account from GakuNin Office if authentication is requested.
attribute-filter.xml
attribute-resolver.xml
handler.xml
internal.xml
relying-party.xml

https://forge.gakunin.nii.ac.jp/svn/GakuNinmAP/local-map/idp-lib/
Please obtain an account from GakuNin Office if authentication is requested.
mysql-connector-java-5.1.10.jar
Modify Configuration
- attribute-resolver.xml
Modify“SALT”to appropriate random values.
Setup database password to be the same one with “6. Installing and Setting Up MySQL”.
Modify “Host name of the IdP”to this server host name. - relying-party.xml
Modify “Host name of the IdP” to this server host name.
Define SP metadata which utilize local mAP system.
Define the metadata of Global mAP(https://map.gakunin.nii.ac.jp/idp/shibboleth)
* In general, the metadata of the Global mAP is automatically integrated if the IdP ingest the federation metadata.
Overwrite the configuration files.
Back Up First
$ cd /opt/shibboleth-idp/conf
$ sudo cp attribute-filter.xml attribute-filter.xml.bk
$ sudo cp attribute-resolver.xml attribute-resolver.xml.bk
$ sudo cp handler.xml handler.xml.bk
$ sudo cp internal.xml internal.xml.bk
$ sudo cp relying-party.xml relying-party.xml.bk

Then Copy
$ cd
$ sudo cp attribute-filter.xml /opt/shibboleth-idp/conf/.
$ sudo cp attribute-resolver.xml /opt/shibboleth-idp/conf/.
$ sudo cp handler.xml /opt/shibboleth-idp/conf/.
$ sudo cp internal.xml /opt/shibboleth-idp/conf/.
$ sudo cp relying-party.xml /opt/shibboleth-idp/conf/.
Metadata Deployment
- The metadata of this SP has already been stored in the following location.
/etc/shibboleth/metadata/sp-metadata.xml - Store the metadata of this IdP in the following location.
/opt/shibboleth-idp/metadata/idp-metadata.xml - Include the metadata of this IdP in the shibboleth2.xml of the SP which utilizes for local mAP.
Deployment of the MySQL driver
$ sudo cp mysql-connector-java-5.1.10.jar \
[TOMCAT install directory] /webapps/idp/WEB-INF/lib/.

$ sudo cp mysql-connector-java-5.1.10.jar /opt/shibboleth-idp/lib/.
Configuration for StoredID
Create table for StoredID in the MySQL database.
https://meatwiki.nii.ac.jp/confluence/display/GakuNinShibInstall/StoredID
“4. Create table in the database (In case of MySQL)”
$ mysql -u root vo
mysql> put SQL commands here.
Back Channel
Configure for back channel by referring to the following instruction.
Create credential
# cd /opt/shibboleth-idp/credentials
# openssl pkcs12 -export -out pkcs12.p12 -in idp.crt -inkey idp.key -name HOST-NAME-OF-THIS-SERVER
Enter Export Password: YOUR-OWN-PASSOWRD
Verifying - Enter Export Password: YOUR-OWN-PASSWORD

# keytool -importkeystore -srckeystore pkcs12.p12 -destkeystore keystore.jks \
-srcstoretype pkcs12 -deststoretype jks -srcalias HOST-NAME-OF-THIS-SERVER \
-destalias HOST-NAME-OF-THIS-SERVER -storepass YOUR-OWN-PASSOWRD
Enter source keystore password: YOUR-OWN-PASSOWRD
keystore.jks will be generated.
* This instruction assume IdP certificate as idp.crt and idp.key.
Back Channel Port
Enable 8443 port in the server.xml of Tomcat configuration file.
Server.xml can be found in the following location if the Tomcat was installed by using yum
/usr/share/tomcat6/conf/server.xml
Add following configuration.
<Connector port="8443"
               maxHttpHeaderSize="8192"
               maxSpareThreads="75"
               scheme="https"
               secure="true"
               clientAuth="want"
               SSLEnabled="true"
               sslProtocol="TLS"
               keystoreFile="/opt/shibboleth-idp/credentials/keystore.jks"
               keystorePass="YOUR-OWN-PASSWORD"
               truststoreFile="/opt/shibboleth-idp/credentials/keystore.jks"
               truststorePass="YOUR-OWN-PASSWORD"
               truststoreAlgorithm="DelegateToApplication"/>
Deployment
$ sudo /etc/init.d/tomcat6 stop
$ sudo /etc/init.d/tomcat6 start

Restart SP as well in order to include the metadata of newly configured IdP.
$ sudo /etc/init.d/shibd restart
$ sudo /etc/init.d/httpd restart
Installing the Application
Importing the Account Data from the Existing Database
Metadata
Validation